Turbo Yamaha Nytro MTX build thread

Lococoin

Active VIP Member
Joined
Aug 8, 2007
Messages
738
Reaction score
183
Location
Airdrie, Alberta
I started a build thread over at but figured I should post on here too.

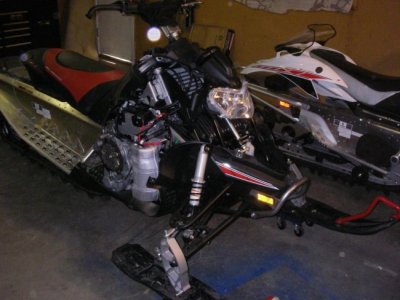
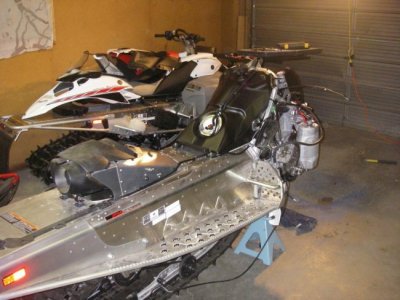
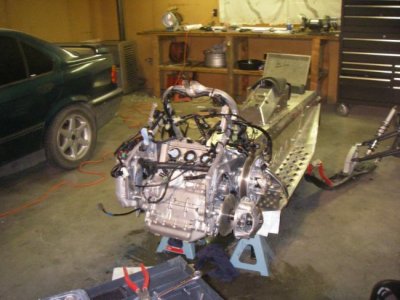
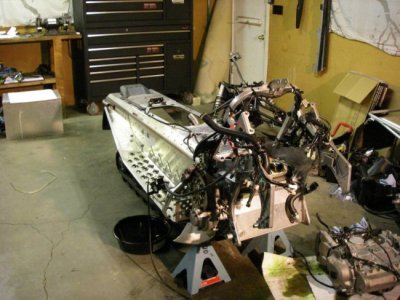
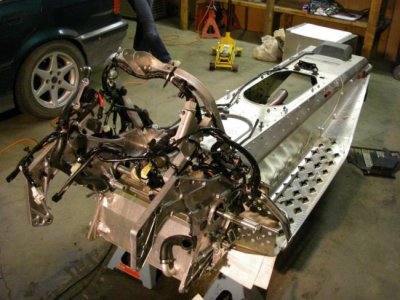
This fall I picked up an 08 Nytro MTX from a member on here. The sled had 67 km's on it so pretty much brand new. The plan was to run it stock for the season but I found a new but used Powderlites stage 2 kit on Ty4stroke.com and decided to pull the pin on it.

After getting jerked around my Purolator i finally got my turbo kit in. The box wasnt exactly in mint shape so i was a bit leary as to what I would find inside. It looks like the only thing that got a bit of a road rash was my intercooler. Doesnt look to be anything major and hopefully it will bend back ok without breaking. The price you pay when buying second hand, although im a happy man since i saved around $1600 from what it would be for me to buy that kit from Powderlites right now. UPDATE: After mentioning to Darren from Powderlites that my intercooler was damaged, he offered to take it back with him and will be shipping it out next week once it is repaired. I am really happy with the customer service so far, its nice to see some decent service in a day and age when it seems that nobody gives a crap.

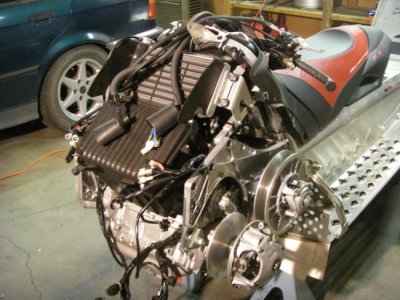
Here is the complete turbo kit. As you can see it has a lot of pieces and is supposed to be a complete kit. That's refreshing because I know exactly how much the little stuff adds up from when I did the custom kit on my Honda Civic. The instructions that come with the kit(via email) are pretty vague for someone who isnt doing these kits on a daily basis. I guess there are upgraded instructions which will be available shortly so that will be nice.
 

Attachments

  • IMGP1831 [1024x768].jpg
    IMGP1831 [1024x768].jpg
    102.1 KB · Views: 253

Lococoin

Active VIP Member
Joined
Aug 8, 2007
Messages
738
Reaction score
183
Location
Airdrie, Alberta
Today I started the tear down. I wanted to get the engine out because I am going to be bringing it up to work with me on Wednesday. The plan is to do the head shim and cam timing up there while im working two weeks, and then i can just get right to reinstalling the engine when i get back. Followed by the turbo kit shortly after. Then last but not least the new track, drivers, and rails.

Here are some pictures of the tear down today. I would like to thank Mudhellya(Marc) for helping me lower the engine out, definitely a lot easier than trying to manhandle yourself.

I am definitely impressed with the way this thing comes apart. It is a pain to get the engine out because of the rider forward position, but nothing is overly complicated to do and can be done with basic hand tools. We will see what i say after trying to get it back together :lol:
 

Attachments

  • plasticoff.jpg
    plasticoff.jpg
    60.9 KB · Views: 241
  • headlightoff3.jpg
    headlightoff3.jpg
    75.4 KB · Views: 238
  • airbox_off2.jpg
    airbox_off2.jpg
    67.1 KB · Views: 235
  • subframe1.jpg
    subframe1.jpg
    60 KB · Views: 231
  • seat_off.jpg
    seat_off.jpg
    69.2 KB · Views: 222
  • subframe_off2.jpg
    subframe_off2.jpg
    79.2 KB · Views: 235

Lococoin

Active VIP Member
Joined
Aug 8, 2007
Messages
738
Reaction score
183
Location
Airdrie, Alberta
More Pictures
 

Attachments

  • tank_off.jpg
    tank_off.jpg
    64.9 KB · Views: 222
  • heatshield_off.jpg
    heatshield_off.jpg
    73.7 KB · Views: 215
  • throttle_bodies_off2.jpg
    throttle_bodies_off2.jpg
    65.6 KB · Views: 233
  • engine_out1.jpg
    engine_out1.jpg
    74.6 KB · Views: 229
  • engine_out2.jpg
    engine_out2.jpg
    76.3 KB · Views: 214

Mikew5j

Active VIP Member
Joined
Mar 7, 2008
Messages
1,037
Reaction score
945
Location
Namao, Alberta
Well, your off to a good start. I always find it a bit unsettling to see a sled in pieces like that. At least you took pictures so you should be able to figure out how to get it back together.:eek: Cant wait to see it completed, and maybe try it out.:d
 

Lococoin

Active VIP Member
Joined
Aug 8, 2007
Messages
738
Reaction score
183
Location
Airdrie, Alberta
I finally got around to doing the head shim and cam timing changes.

Valve cover off:


camshafts out:


Cylinder head:


Block:


camshafts/camshaft caps:


Head shim with spray a gasket on both sides. You split the new head gasket into two pieces and sandwich the head shim in between:


Head retorqued. You need to torque it to 18 ft lbs in proper sequence, then losen off and retorque to 18 ft lbs. From there you need to torque the bolts 175-185 degrees. I did this in two steps as per the powderlites instructions but the service manual doesnt say anything about an additional step. If you turn them past the required angle, do not losen and retighten, you will need to replace the bolt and redo the tightening sequence:


Setting camshafts to match powderlites cam degree shim:


Cam gear holes made bigger on exhaust side to change advance the cam. Intake side requires you to retard the cam by 1 tooth so no grinding required:


This picture shows the change in cam position after the overlap has been removed:
 

jrusher

Active VIP Member
Joined
Jun 6, 2008
Messages
284
Reaction score
683
Location
Edmonton
Great pics Steve and good info.. Something to watch for when I was torqueing my cylinder bolts one bolt out of the eight must of been stretched too much prior and would not torque up like the rest.. I went 90 degress in steps but it didnt matter.. I would even go 45 dergree steps .. Got a couple extra bolts on there way..
 

cey800

Active VIP Member
Joined
Nov 12, 2006
Messages
451
Reaction score
7
Any idea how many hours for the complete install? How much boost are you going to run?
 

Lococoin

Active VIP Member
Joined
Aug 8, 2007
Messages
738
Reaction score
183
Location
Airdrie, Alberta
Great pics Steve and good info.. Something to watch for when I was torqueing my cylinder bolts one bolt out of the eight must of been stretched too much prior and would not torque up like the rest.. I went 90 degress in steps but it didnt matter.. I would even go 45 dergree steps .. Got a couple extra bolts on there way..

Im not sure exactly what you mean. What exactly gave you the idea that a couple of the bolts were stretched, or did you go over the 175-185 angle?
 

Lococoin

Active VIP Member
Joined
Aug 8, 2007
Messages
738
Reaction score
183
Location
Airdrie, Alberta
Any idea how many hours for the complete install? How much boost are you going to run?

Im into it for about 12 hours or so right now but im taking my time as this is the first time ive had the sled apart.

I want to run pump gas at the start, i think you are supposed to be able to run 14 lbs at elevation on pump gas so ill be running less than that in the beginning. Boost is very addicting so i cant say how long it will be running at that level:d
 

jrusher

Active VIP Member
Joined
Jun 6, 2008
Messages
284
Reaction score
683
Location
Edmonton
Im not sure exactly what you mean. What exactly gave you the idea that a couple of the bolts were stretched, or did you go over the 175-185 angle?

I was just about at the 180 degrees angle and the bolt felt like it was pulling the threads out of the cases.. It wasnt tightening it musta hit its yeild point and was stretching as the threads are fine... These are a necked down bolt and will stretch alot easier it seems..
 

Lococoin

Active VIP Member
Joined
Aug 8, 2007
Messages
738
Reaction score
183
Location
Airdrie, Alberta
I was just about at the 180 degrees angle and the bolt felt like it was pulling the threads out of the cases.. It wasnt tightening it musta hit its yeild point and was stretching as the threads are fine... These are a necked down bolt and will stretch alot easier it seems..

Ahh, ok i see what you mean. Mine didnt quite feel like that.

So what are new head bolts worth anyway?
 

teeroy

Active VIP Member
Joined
Oct 7, 2007
Messages
9,100
Reaction score
14,101
Location
Roma, Alberta
nice pics Steve, great step by step goin on there.

my buddy Mike from Berwyn just started working out in the Chin for Apache as a mechanic, say hello to him for me when he gets back (he's on days off now). he is a die hard sledder, he's got a '98 T-Cat and an '07 M-1. he had a bad crash back in '03 on the T-Cat, and has a bit of a bum leg from it. broke his tibia and fibula, as well as the ball from the top of his femur. great guy and a helluva mechanic....we call him "Blizzo". tough as nails mofo....
 

Lococoin

Active VIP Member
Joined
Aug 8, 2007
Messages
738
Reaction score
183
Location
Airdrie, Alberta
nice pics Steve, great step by step goin on there.

my buddy Mike from Berwyn just started working out in the Chin for Apache as a mechanic, say hello to him for me when he gets back (he's on days off now). he is a die hard sledder, he's got a '98 T-Cat and an '07 M-1. he had a bad crash back in '03 on the T-Cat, and has a bit of a bum leg from it. broke his tibia and fibula, as well as the ball from the top of his femur, he has a tough time with mobility but you'll never hear him complain about it. great guy and a helluva mechanic....we call him "Blizzo". tough as nails mofo....

Ya Mike was telling me that story last shift. He is a hell of a mechanic, we are glad to finally have a mechanic on the other shift.

I will tell him you said hi, right after i call him Blizzo:d
 

Lococoin

Active VIP Member
Joined
Aug 8, 2007
Messages
738
Reaction score
183
Location
Airdrie, Alberta
The instructions call for the big turbo hanger to be on the outside on the short section. I found that things didnt line up the way I liked that way so I am going to put them both on the inside.


I am going to try running the exhaust upside down so I can put a jerry can on the tunnel. The exhaust is pretty tight against the side of the tunnel, I may do a bit of trimming later. That or I will put a piece of rubber there to stop the exhaust from getting cut up too bad on the tunnel.
 
Top Bottom