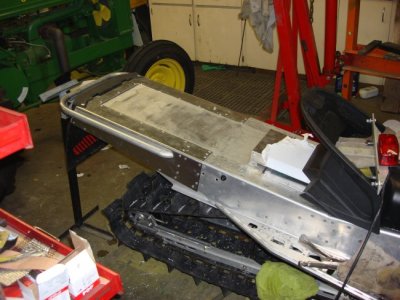
i was wondering how much to extend tunnel.... from rear of track and the rear of the tunnel ... how much tunnel should be past the end of the track..it doesn't show on pics but the tunnel is about 2 or 3 inches past the track

You are using an out of date browser. It may not display this or other websites correctly.
You should upgrade or use an alternative browser.
You should upgrade or use an alternative browser.
tunnel
- Thread starter boots
- Start date

glengine
Active VIP Member
If it extends 2-3" past end of track thatwill be just fine.
Maverick800XRS
Active VIP Member
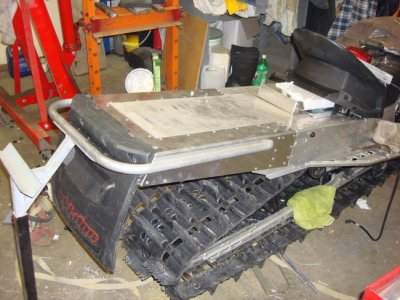
Nice extension ! good work boots.
Going from 159 to 162 i should be able to get away with it, my snow flap sticks out a little to so even if it's in line i think it will be alright if it's not enough ill just take the snow flap off haha !
Are you going to put the tail light back on ? seeing yours without one is making me contemplate taking mine off.
Going from 159 to 162 i should be able to get away with it, my snow flap sticks out a little to so even if it's in line i think it will be alright
if it's not enough ill just take the snow flap off haha ! Are you going to put the tail light back on ? seeing yours without one is making me contemplate taking mine off.
- Thread starter
- #4
well i didn't go from 159...162... it was a 151.... as for the brake light yes i put it back on but made my own... since when i bought it there was none... snow flap is staying on so that the peeps i pull out don't get sprayed as bad haha... i will post some more pics when i am done everything...
I went from 159 to 162, had no extension. Also had a cut snowflap and 2" drop on the back. It overheated all the time on the trail in, and out, even with scratchers. I found an intact snowflap and it is ok now.
- Thread starter
- #6
I went from 159 to 162, had no extension. Also had a cut snowflap and 2" drop on the back. It overheated all the time on the trail in, and out, even with scratchers. I found an intact snowflap and it is ok now.
i was told to extend it just for the point that i will over heat.... i didn't just and extension but moved the exchanger back as well... total of 7 inches
glengine
Active VIP Member
Nice extension ! good work boots.
Going from 159 to 162 i should be able to get away with it, my snow flap sticks out a little to so even if it's in line i think it will be alright
Are you going to put the tail light back on ? seeing yours without one is making me contemplate taking mine off.
But if you are also doin the D&R you'll need a tunnel extension as the skid also gets moved back in the tunnel, they have one thats built specifically for your application at specialty sleds.. It was designed for the 162 with D&R. You are correct though in the fact that if you just go from a 159 to 162 you dont need an extension. But definitely run a snow flap or there is a really good chance you'll have cooling issues.
- Thread starter
- #8
glengine
Active VIP Member
i didn't move sikd back just put rail ext., i got my parts from mountain magic... they were very helpful....
Yah to go from a 151 to 162 you'd need rail extensions but maverick is doing a drop and roll so he'll have to move the skid back in the chasssis, if not doing a d&r you wouldn't need to move skid back.
Maverick800XRS
Active VIP Member
After reading the instructions for the D&R i noticed they call to move the skid back... oh crap.. LOL sorry for the thread jack Boots. I never thought of that !!! with Rear drops and cut snow flap your cooling will be shoot to hell... hmmmm, that's no good. I might need an extension now
- Thread starter
- #11
np that is why theses threads are started so people can get more infoAfter reading the instructions for the D&R i noticed they call to move the skid back... oh crap.. LOL sorry for the thread jack Boots. I never thought of that !!! with Rear drops and cut snow flap your cooling will be shoot to hell... hmmmm, that's no good. I might need an extension now
After reading the instructions for the D&R i noticed they call to move the skid back... oh crap.. LOL sorry for the thread jack Boots. I never thought of that !!! with Rear drops and cut snow flap your cooling will be shoot to hell... hmmmm, that's no good. I might need an extension now
Most decent D&R's will require a skid setback or trimming the rails, otherwise they will hit the drivers.
Maverick800XRS
Active VIP Member
Most decent D&R's will require a skid setback or trimming the rails, otherwise they will hit the drivers.
Ya figured that was the reasoning, better not screw with the measurements on how much they call to move it and just deal with my problem in other ways, looks like ill need to drill more holes
yay !!!My biggest issue has been i am trying to do too many things at once, trying to juggle changing the suspension, adding rear drops and moving the front arm along with new running boards and then a D&R after thought. Jeez, i dream of working on my dang machine with all that stuff LOL. Guess can add tunnel extension onto that list now
At least i bought myself a nice new Dewalt 5" grinder and some zip cut discs to help me along, those blasted BRP rivets that have smooth heads are no match for me
but there's still way too many LOL.Happy modding everyone !
glengine
Active VIP Member
Ya figured that was the reasoning, better not screw with the measurements on how much they call to move it and just deal with my problem in other ways, looks like ill need to drill more holes
My biggest issue has been i am trying to do too many things at once, trying to juggle changing the suspension, adding rear drops and moving the front arm along with new running boards and then a D&R after thought. Jeez, i dream of working on my dang machine with all that stuff LOL. Guess can add tunnel extension onto that list now
At least i bought myself a nice new Dewalt 5" grinder and some zip cut discs to help me along, those blasted BRP rivets that have smooth heads are no match for me
Happy modding everyone !
The trick to drilling out the smooth headed rivets of brp's is use a good drill bit and just drill them slowly. If you try to spin drill to fast they'll just dull the bit really fast, but if you drill slowly you'll have success. And whenever possible i drill them from the back side. sometimes you'll find when drilling from the backside taht it seems to stop drill and it's because there will be a little aluminum cap peice stuck on the end of the drill bit. Take that off of the bit and then good to go again.
Maverick800XRS
Active VIP Member
The trick to drilling out the smooth headed rivets of brp's is use a good drill bit and just drill them slowly. If you try to spin drill to fast they'll just dull the bit really fast, but if you drill slowly you'll have success. And whenever possible i drill them from the back side. sometimes you'll find when drilling from the backside that it seems to stop drill and it's because there will be a little aluminum cap peice stuck on the end of the drill bit. Take that off of the bit and then good to go again.
Good advice as usual Glen
thanksAfter doing LOTS of these i have found this to be the easiest way. If you have a decent angle grinder get yourself a walter HP Combo disc (cuts and grinds) then grind off the back side of the rivet flat, whatever is being held on by the rivets will pretty much fall off (no prying or wrecking anything, and if you happen to slip and nick the tunnel or the piece you are working on it's on the back side and you won't be able to see it). Now you will need to grind down whats left of the rivet flat on the back side, once it's flat you will need to punch out the rest of the rivet and the head. A punch and a hammer will do this but if you want to save some work for yourself and some time, if you have an air hammer, just get a pointy punch and 2 hits the rivet is flying across the room.
I tried punching the heads of these and drilling but it never worked at all for me... maybe someone else will have better luck haha.
Good advice as usual Glen
After doing LOTS of these i have found this to be the easiest way. If you have a decent angle grinder get yourself a walter HP Combo disc (cuts and grinds) then grind off the back side of the rivet flat, whatever is being held on by the rivets will pretty much fall off (no prying or wrecking anything, and if you happen to slip and nick the tunnel or the piece you are working on it's on the back side and you won't be able to see it). Now you will need to grind down whats left of the rivet flat on the back side, once it's flat you will need to punch out the rest of the rivet and the head. A punch and a hammer will do this but if you want to save some work for yourself and some time, if you have an air hammer, just get a pointy punch and 2 hits the rivet is flying across the room.
I tried punching the heads of these and drilling but it never worked at all for me... maybe someone else will have better luck haha.
I do the same way as this only I use a sanding disc on the grinder. This way it doesn't cut into the tunnel if you get over-ambitious about grinding.
snotterite
Active VIP Member
Use a die grinder with a gouging or engraving bit. The angle of the debris flutting keeps the allluminun from capping the bit end. Once you see the expansion chamber of the rivet they will pop right out with a body hammer and appropriate size center punch.
If your debris shows signs of blueing..dip the bit in wax. Heat only makes the expansion chamber harder to punch out and will leave a raised edge. Not a issue if your tossing that part...but if you plan on selling or reuseing that piece you dont want a raised edge. When reassembling never sand raised edges flat..always body hammer and backside block them. Sanding changes the O.D.
If your debris shows signs of blueing..dip the bit in wax. Heat only makes the expansion chamber harder to punch out and will leave a raised edge. Not a issue if your tossing that part...but if you plan on selling or reuseing that piece you dont want a raised edge. When reassembling never sand raised edges flat..always body hammer and backside block them. Sanding changes the O.D.
Maverick800XRS
Active VIP Member
I do the same way as this only I use a sanding disc on the grinder. This way it doesn't cut into the tunnel if you get over-ambitious about grinding.
I use a flap wheel to clean things up if i happen to nick anything or something that the air angle grinder and a rollock pad can't fix. Maybe i should try starting with it instead haha
Similar threads
- Replies
- 3
- Views
- 1K
