Renegade Rebuild and Review 2007 model

sumx54

Active VIP Member
Joined
Oct 5, 2007
Messages
5,479
Reaction score
5,702
Location
Rocky Mountain House
Website
www.absoluteadventure.ca
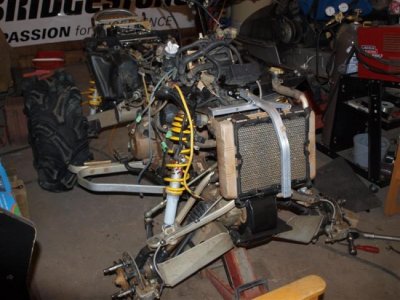
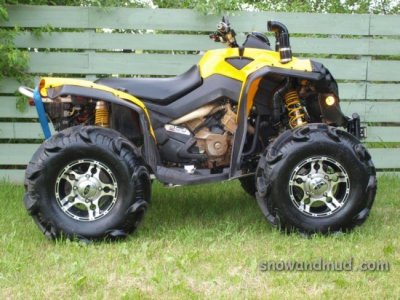
We share almost the same riding style Ron, this thread has me really wondering what my 08' Outlander with 3500 miles on it looks like inside and out. I doo know my shocks got pounded out a while back and I updated my suspension to the Renegade style. I have noticed my frame isn't pounded half as bad as that one :confused: CRAZY
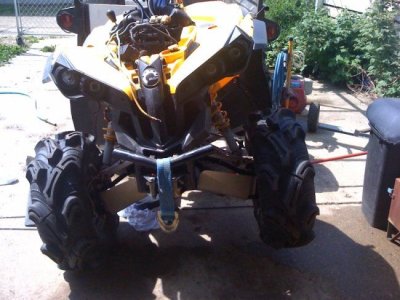
Are you going to beef up the rear swing arm spindles on the frame at all?
 

gforce

Active VIP Member
Joined
Nov 17, 2006
Messages
4,776
Reaction score
728
Location
ANTLER LAKE
oh i just know theres gonna be a big box parts left over..i just know it..lol
 

rknight111

Administrator
Administrator
Moderator
Joined
Sep 27, 2006
Messages
13,385
Reaction score
22,257
Location
Parkland County, AB and Valemount, BC
Website
www.snowandmud.com
Ive found a few more small issues and ordered a few more parts. There is a motor stabilization mount that was stretched quite a bit, the new one was 1/2" shorter. The bolts on the front differential were quite loose. The bolts to the front a-arms were loose. It was a bit of work to clean and re-grease the rear arms, but that all works good now. There was alot of wear spots on the gas tank as well.
 

Attachments

  • P6096745 (Medium).jpg
    P6096745 (Medium).jpg
    70.8 KB · Views: 87
  • P6096751 (Medium).jpg
    P6096751 (Medium).jpg
    85.5 KB · Views: 87
  • P6096757 (Medium).jpg
    P6096757 (Medium).jpg
    56.3 KB · Views: 94
  • P6096760 (Medium).jpg
    P6096760 (Medium).jpg
    61.1 KB · Views: 93

Sledderglen

Super Moderator
Moderator
Joined
Nov 30, 2006
Messages
7,039
Reaction score
4,658
Location
The Trailerhood
Get that thing together Ron. campout coming up faster then you think. Looks good Ron now you know how it works
 

goodngrubby

Active VIP Member
Joined
Nov 29, 2008
Messages
3,452
Reaction score
4,827
Location
Nanaimo
Hey Ron, how hard was it to pound the sqaure tubing into your frame? I was going to do the mod as well, but I see I have a couple of small dents on the bottom of my frame, not sure if I can bang it in or not.
 

rknight111

Administrator
Administrator
Moderator
Joined
Sep 27, 2006
Messages
13,385
Reaction score
22,257
Location
Parkland County, AB and Valemount, BC
Website
www.snowandmud.com
Hey Ron, how hard was it to pound the sqaure tubing into your frame? I was going to do the mod as well, but I see I have a couple of small dents on the bottom of my frame, not sure if I can bang it in or not.
Very easy, I spot welded the three pieces together and spot welded a piece of metal to the end to hit with a sledge hammer. It went in with less force than I thought as my frame was damaged at the bottom as well. Didn't put the skid plates on when I first bought it. Once I drove them in, I cut off about 1" of pipe as it started to mushroom a bit then welded a plate on the end.

Renegade / Outlander Steering Post Repair

I couldn't get a steering post so I cut the top off, got a solid piece of stock 1' long, welded it from the top and sides to the inside of the top flange then got 24" of the thicker walled steel pipe and slotted the ends and slipped that over the solid stock welding the 2 slots in and then put a good bead around the exterior of the pipe to the flange. The bottom when cutting the pipe off, cut 1" up from the bottom of the plate with the two holes as the bottom plate has a 1" solid pipe and it is sleeved by the exterior pipe. Then I warmed it up a bit and using a chisel separated the exterior pipe from the bottom flange leaving a 1" stub to weld the new pipe to. Since I went with a thicker walled pipe I had to grind the stub down a bit on the sides to slide the new pipe over. I slotted both sides of the pipe I was welding to the base, so I can weld them securely together by filling the slots up to the stub, then ran a nice bead all around the base to the bottom pipe. Then I spent some time cleaning this all up and took down to Impact powdercoatings and picked it up the next day, then installed it :)

I will get this all completed today and will be going for a run tommorow. It allready feels alot tighter, no rattles.
 

rknight111

Administrator
Administrator
Moderator
Joined
Sep 27, 2006
Messages
13,385
Reaction score
22,257
Location
Parkland County, AB and Valemount, BC
Website
www.snowandmud.com
Hey Glen, the Renegade is completed. It is sure alot tighter and no rattles. The front end feels tight and all together. It has been stripped right to the frame, welded and then put back together. This was alot more than I thought it would be, but over this I found alot of things that needed attention and fixed everything. It was a bit tough to bleed the air from the brake lines and get the back driveshaft bolted to the rear differential. But other than that its ready. I ran it for a few hours and it was all fine. Took for a short rip. Its like a new machine. I added the fan override switch as well.

What I need to do now is rebuild the front bumper and build a small rack in the back, thats next. The original front bumper is quite bent. A tree just popped out in front of me out by Pinehurst lake. And I remounted my plates with snap-ties, it shouldn't come off now, and dont laugh at my plates I never picked the AH its 4:20.
 

Attachments

  • Resized_P6206839.jpg
    Resized_P6206839.jpg
    76.2 KB · Views: 84
  • Resized_P6206838.jpg
    Resized_P6206838.jpg
    68.5 KB · Views: 81
  • Resized_P6206837.jpg
    Resized_P6206837.jpg
    74.4 KB · Views: 84
Last edited:

TylerG

Super Mod Geek
Administrator
Moderator
Joined
Nov 7, 2006
Messages
30,485
Reaction score
27,731
Location
Parkland County
Looks like its sitting really really low in the rear Ron, maybe time for new rear suspension?
 

goodngrubby

Active VIP Member
Joined
Nov 29, 2008
Messages
3,452
Reaction score
4,827
Location
Nanaimo
I see you use the same tow strap as me, axle strap from Princess Auto?
 

rknight111

Administrator
Administrator
Moderator
Joined
Sep 27, 2006
Messages
13,385
Reaction score
22,257
Location
Parkland County, AB and Valemount, BC
Website
www.snowandmud.com
I see you use the same tow strap as me, axle strap from Princess Auto?

Yep, good Idea, Im hoping to get my winch fixed now. I need the entire motor side. When I hit a tree hard, it broke in half. The winch was new. :(
Just looking on line tonight.

Also, for those that have snorkles, have you ever tested your snorkles? I take off the pipe just above the MJ Clamps on mine, above my hood. On both intake and exhaust and fill it up untill it starts to reach the top of the other side. Then wait a minute and is there water leaking anywhere? If there is your snorkles will fail to you CVT. Reseal better. I use RVT Automotive silicone and a new gasket each time. On the gasket I cut the long thin side down about 3/16" as its too long. Its a T and the long thin side fits in the grove of your CVT cover. Remember also on the Can-Am at the back go around the bolt, not overtop of it as that is how you drain your CVT if it is full of water.
 

rknight111

Administrator
Administrator
Moderator
Joined
Sep 27, 2006
Messages
13,385
Reaction score
22,257
Location
Parkland County, AB and Valemount, BC
Website
www.snowandmud.com
Also I changed all the fluids, firstly the engine, I let it run for a few minutes and then drained the oil. I jacked it on its side a bit to assist on getting the dirte oil all out of the engine and when taking off the filter oil just runs down the engine and I was able to put a rag beneath to catch all the oil. With the Transmission, when taking out the bottom plug the oil was milky a bit, so I drained it. Then put the cap on. Filled it with some regular cheap oil. pushed the quad forward and back, then drained that too. Then I put the recommended oil in, Skidoo XPS chain case oil, 1 1/2 bottles. And in the engine I ran Amsoil Formula 4-Stroke 0-W 40 Synthetic Motor Oil. Just over 2 - 3/8 Litres
To put the oil in the transmission I just rigged up a funnel and hose rather than waiting and did something else, that seemed to work well.


Amsoil 40 ATV
 

Attachments

  • oil1.jpg
    oil1.jpg
    68.9 KB · Views: 91
  • oil2.jpg
    oil2.jpg
    91.9 KB · Views: 84
  • oil3.jpg
    oil3.jpg
    65.2 KB · Views: 90
  • oil4.jpg
    oil4.jpg
    101.2 KB · Views: 85

DaveB

Active VIP Member
Joined
Sep 18, 2007
Messages
5,884
Reaction score
16,626
Location
Red Deer area
Is your tranny breather extended? Fuel tank breather? Can't see them in your pics...
 

Murminator

Timber King
Moderator
Joined
May 22, 2007
Messages
5,615
Reaction score
2,498
Location
NE Edmonton
I see you put on the "Murminator I don't want to walk in the mud" recovery strap

Looks like your front bumper is still a bit crookered
 

grnboyz

Active VIP Member
Joined
May 22, 2008
Messages
1,058
Reaction score
2
Location
alberta beach
How did you install a fan switch, so it can still turn on by itself?
You also talk about greasing the machine every time before using it, can you list all the places you grease, just to make sure I'm not missing any?
Thanks
 

DaveB

Active VIP Member
Joined
Sep 18, 2007
Messages
5,884
Reaction score
16,626
Location
Red Deer area
How did you install a fan switch, so it can still turn on by itself?
You also talk about greasing the machine every time before using it, can you list all the places you grease, just to make sure I'm not missing any?
Thanks

I'd grease the front upper and lower A-arms (8 zerks) every other ride and get the U-joints every ride (3 zerks...one on the front shaft, two on the rear).
 
Top Bottom