
FossY
Active VIP Member
finished my snow eliminator install today
thought some folks might wanna have a little walk trough how too install thos things
i bought mine from ebay 89bucks
tools required or recomendet
electric drill
cordless drill
air rivet gun
digrinder straight and 90`
cuttingwheel
sandingwheels
visegrips or clamps
rugs
airgun
hammer
rivets
wholesaw

so if you have that or something like that we can get started
first you have to:
clean ure runningboards
put the eliminators on runningboard
fit them so they sit nicely
clamp tham down so they cant move anymore
drill little guidewholes in every corner for later reference

after you did this its time to mark the cut outs
just use a black marker and circle the wholes than remove the clamped on eliminators
should look like this

on my style it was an option to cut out also the wholes what u donthave to do
in order to drill the wholes use a wholesaw (really pain in the ....) but i got it done


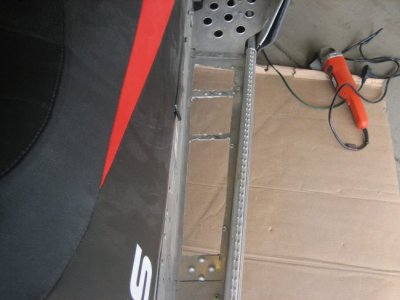
next step would be to cut the premarked wholes out
what you will do with the digrinder and a cuttingwheel
(little tip: good to keep some old small cuttingwheels cause you can cut axactlier whit them )


after all cutting is done grind all the edges nice and smooth check with ure finger till there are no more sharp edges

so the hardest work is done so far
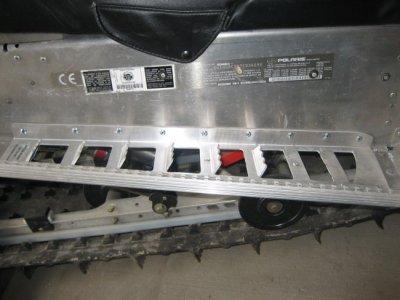
now you put the eliminator back in place and line it up with the predrilled wholes in step 1 !!!!
clamp the eliminator back in place (some thick paper or a rug between runningboards and pliers want give you any scratches)
now its time to drill the wholes for the rivets
measure the sice of ure rivethead which will tell u the drillsize you will need
than widen the guidewholes and rivet them down
you see i also used clamps in the middle to ensure the runningboards and the eliminator are nicely together and your wholes will line up


thought some folks might wanna have a little walk trough how too install thos things
i bought mine from ebay 89bucks
tools required or recomendet
electric drill
cordless drill
air rivet gun
digrinder straight and 90`
cuttingwheel
sandingwheels
visegrips or clamps
rugs
airgun
hammer
rivets
wholesaw

so if you have that or something like that we can get started
first you have to:
clean ure runningboards
put the eliminators on runningboard
fit them so they sit nicely
clamp tham down so they cant move anymore
drill little guidewholes in every corner for later reference

after you did this its time to mark the cut outs
just use a black marker and circle the wholes than remove the clamped on eliminators
should look like this

on my style it was an option to cut out also the wholes what u donthave to do
in order to drill the wholes use a wholesaw (really pain in the ....) but i got it done


next step would be to cut the premarked wholes out
what you will do with the digrinder and a cuttingwheel
(little tip: good to keep some old small cuttingwheels cause you can cut axactlier whit them )


after all cutting is done grind all the edges nice and smooth check with ure finger till there are no more sharp edges

so the hardest work is done so far
now you put the eliminator back in place and line it up with the predrilled wholes in step 1 !!!!
clamp the eliminator back in place (some thick paper or a rug between runningboards and pliers want give you any scratches)
now its time to drill the wholes for the rivets
measure the sice of ure rivethead which will tell u the drillsize you will need
than widen the guidewholes and rivet them down
you see i also used clamps in the middle to ensure the runningboards and the eliminator are nicely together and your wholes will line up


 sure would have liked to try them in the POW.
