Super Sidewinder 2018

chickenman

Active VIP Member
Joined
Feb 21, 2007
Messages
383
Reaction score
596
Location
edmonton
So this the tunnel extension and the boards?? looks great! never had a good look at the stock boards, but the CRs definitely seem like a worthy upgrade
 

niner

Active VIP Member
Joined
Mar 14, 2009
Messages
8,094
Reaction score
57,726
Location
lacombe
I thought you were going to go with the heated running boards and the extra cooler?
 

Lund

Active VIP Member
Joined
May 4, 2013
Messages
4,247
Reaction score
11,288
Location
Vernon/Kelowna
I thought you were going to go with the heated running boards and the extra cooler?

I ran the heated boards on my Nytro, it worked really well keeping the boards clear but i did find a fair amount of ice build up along the tunnel edges.
So this time around i'm going about it in a slightly different way. The CR boards over all clear them self's very well, even with no coolant running through them. So i decided on not running any coolant through them but instead keeping the entire tunnel free from cooler's in the attempt in preventing ice buildup and saving a few pounds. The tunnel is entirely powder coated, instead i'm going to design a new cooler that will be mounted directly under the seat. This way any ice build up acting as extra weight will be centralized under me.
This cooler is of my own design, i will post pictures of it once i get it put together. I'm also hoping to flow approximately 30% more coolant through it over the MTX model to improve cooling on hard pack.
 

Catman10

Drinking the Doolaid
Joined
Sep 30, 2008
Messages
780
Reaction score
2,248
Location
Red Deer Alberta
Boost it makes the exact coolerr you are describing and I will be putting one on as well, it goes beside the coolers in the tunnel and has two little holes in the front that go up for the hoses, nice clean setup.
 

Lund

Active VIP Member
Joined
May 4, 2013
Messages
4,247
Reaction score
11,288
Location
Vernon/Kelowna
Boost it makes the exact coolerr you are describing and I will be putting one on as well, it goes beside the coolers in the tunnel and has two little holes in the front that go up for the hoses, nice clean setup.

Thanks, i will have to look it up and see their design, i haven't started on mine yet.
 

+SLEDWRECKS+

Active VIP Member
Joined
Sep 27, 2012
Messages
492
Reaction score
1,096
Location
Sylvan Lake
Lund, here's a pic for reference of Neil's cooler.
photo (2).jpg
 

Lund

Active VIP Member
Joined
May 4, 2013
Messages
4,247
Reaction score
11,288
Location
Vernon/Kelowna
Thank you, that is the cooler I will be installing on the build.
I see i'am not the only one thinking this way.
 

+SLEDWRECKS+

Active VIP Member
Joined
Sep 27, 2012
Messages
492
Reaction score
1,096
Location
Sylvan Lake
Yes, water/air intercooler, circulated via bosh water pump. No reason that it couldn't work as an engine coolant heater exchanger.
I believe the inlet/outlet size was the same as the stock coolers, so hoses should match up. But, this was on a Polaris....
 

Lund

Active VIP Member
Joined
May 4, 2013
Messages
4,247
Reaction score
11,288
Location
Vernon/Kelowna
I want to buy a tunnel extension like yours. Who made it?it looks great.
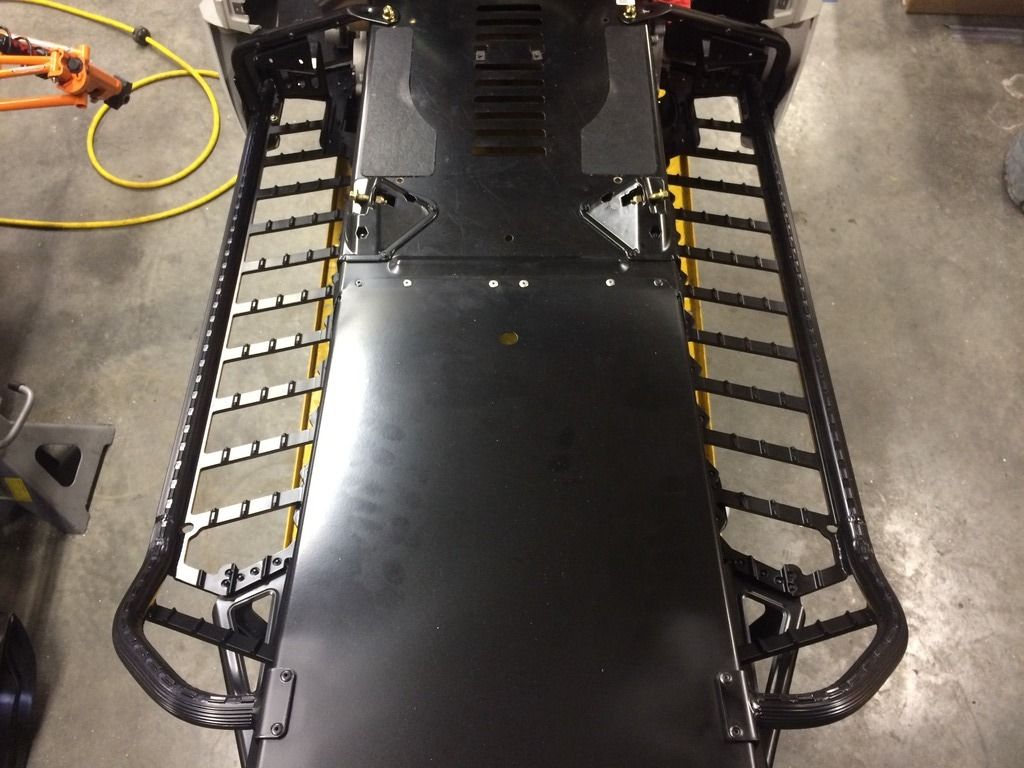
You can get the tunnel caps or complete tunnels from CR-racing. They are designed and manufactured by CR-racing, they are significantly stronger then any of the OEM tunnel's available on OEM sleds. They are much more rigid and typical tunnel flexing found on OEM tunnels is virtually eliminated. Constructed from T6061 aircraft grade aluminum. The full tunnels are .080" and cap's are .065". They are available for all makes, Yam, Cat, Doo and Pol.
 

Lund

Active VIP Member
Joined
May 4, 2013
Messages
4,247
Reaction score
11,288
Location
Vernon/Kelowna
Looks like your tunnel and boards are done, what's next? Looking great.
Going to be installing the 36" A-arm's next and assemble the front suspension.
I have ordered the aluminum needed for the new heat exchangers and still waiting for it. I believe it will arrive next week.
Then i will start on fabricating the new cooler.
 

Lund

Active VIP Member
Joined
May 4, 2013
Messages
4,247
Reaction score
11,288
Location
Vernon/Kelowna
So what's the trick/process for doing these running boards?

Sorry, i missed this post skegpro.
There are no trick's involved. It's hard for me to give advice on doing this because for me it is not a big deal, i have the tooling and experience in doing builds, i have done a lot of them.
I would hate to tell someone to go for it and they end up screwing up their sled and it would cost them alot of $$$ to fix it afterwards. You are literally cutting it up.
The biggest thing i think is your own confidence and skill's. Fabricating skill's and some mechanical skill's are great assets in this, not just internet BS and head knowledge. Being able to actually do it physically, skillfully is #1. Then having the right tool's really helps, yes a lot of it can be done with basic tool's but it is much harder and generally the end results are not nearly as good or professional looking.

The running boards took approx. 6hrs to do both sides, the rear tunnel took about 3hrs.
 

Lund

Active VIP Member
Joined
May 4, 2013
Messages
4,247
Reaction score
11,288
Location
Vernon/Kelowna
To add to my last post, here are the main tools used to do the job. Tunnel and boards.
DSC_0045.jpg


If these are your arsenal of tools in an attempt to do this.....step back and rethink the job. You can quickly destroy or seriously damage your sled with certain tools, especially large aggressive tools. Except for a couple the majority of these tool's should never go near a sled to be modified in the manner being discussed.
DSC_0044.jpg
 

Lund

Active VIP Member
Joined
May 4, 2013
Messages
4,247
Reaction score
11,288
Location
Vernon/Kelowna
Well, unless some one wants to see pictures, i'll post them the 36" front A-arms assembly is done and installed.
If anyone wants a 40" A-arm setup, i have one LOL.
 
Top Bottom