Kibbels
Active VIP Member
I'm waiting for mine... I like the extra protection as precaution. Did u remove all the foam inside hood?


I'm waiting for mine... I like the extra protection as precaution. Did u remove all the foam inside hood?
Put in the mountain fit defender today. A lot more than 8 screws so I wonder if that’s changed.
//uploads.tapatalk-cdn.com/20190306/8718b8d05162ad54495cc4080d67d5b5.jpg
//uploads.tapatalk-cdn.com/20190306/cb36973ea17a8025ab8eea04ab19bbaa.jpg
//uploads.tapatalk-cdn.com/20190306/2e8e952192dadf11432dd0103b67b5e1.jpg
//uploads.tapatalk-cdn.com/20190306/573f0e2f55ca8529d73a4d3d2af1271a.jpg
//uploads.tapatalk-cdn.com/20190306/14b1dbd61cc65a35e040f8bc5ac8802d.jpg
At least it’s done now and I don’t have to worry. Lots of rtv between the filter base and nose cone.
Hood is back on.
//uploads.tapatalk-cdn.com/20190306/d482c409ac8d19b42d654ec50fbd0471.jpg
While I was laying on ground putting the t30 back into the hood I noticed this.
Dealer is such a funny guy.
//uploads.tapatalk-cdn.com/20190306/bd8829b83c694663db2cc275924d14d2.jpg
Maybe hour from take apart to hood back on.How long did it take to install
I just ordered one of those defender intakes as well, looks like it will do the trick
Put in the mountain fit defender today. A lot more than 8 screws so I wonder if that’s changed.
Their shipping is fast.
You can’t go wrong with what method you use be it the defender, Lund’s, or even the other poster who used prefilter and straps on the side. Something is better than nothing.
Bottom line is you are still taking intake apart.
Although i I still feel there is an improvement with the ‘19 intake setup. The gasket between hood/intake and just overall fit. I saw no light when I was running a flashlight up in the nose cone and tract.
That being said said I did have a teaspoon of water come down to the nose of the hood after wheeling it around when I took it off after Saturday’s ride.
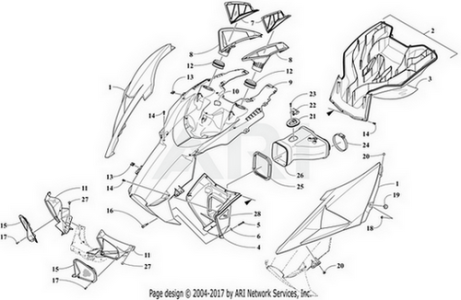
You said yours has a gasket between part #2 and the hood? This diagram is from a 19 alpha.

Oh ok yeah my 18 has that.
Awesome sounds good, looks like it will stop the little bit of moisture getting through and if it does it’s definitely worth the cash and time. Do you think a guy could get at the piece to cut out with a dremel tool?
With the nose piece out and coming at it from the backside (opposite from vertical ribs) I think you could.
Guess I didn’t even think about using the die grinder.
Then you could get it cleaned up real nice.
Do you notice that the sled runs rich now that you have that extra restriction?Not good with intakes leak like they do.
This is what I did to mine little while ago. Same idea as the more expensive filter prescreen setup.
With slp bulk filter screen, adhesive, screws, cost is about $40. It a shame snowmobile manufacturer can’t get a simple intake
system to seal up tight. Then extra cost is the reflective heat tape to cover whole intake keep condensation to a minimum.. hopefully. Plus mine had wide gaps under the frog skins where the two plastics suppose to meet. The 2015 I had all that was one molded piece. Don’t know why u would change from that. Didn’t have snow sucking problems on that one.
http://i.imgur.com/cfeWhGs.jpg
http://i.imgur.com/nxBjNnX.jpg
http://i.imgur.com/iz8pjIR.jpg
http://i.imgur.com/o57FMgi.jpg
http://i.imgur.com/xrkDjqB.jpg
Where you guys ordering the mountain fit kit from?